The Issue
Let’s be frank – WordPress’s menu editor is not that great. Despite WordPress being relatively easy to manage for non-techy people, the navigation menu editor is at least one section of WordPress that probably takes more practice than it should to get used to.
If you’ve had troubles editing navigation menus on your WordPress site, or if you don’t know where to start, let this be your guide.
Understanding Menus vs Menu Locations
There are 2 main concepts to keep in mind when creating and editing menus on a WordPress site, and these are the concepts of menus and menu locations.
Menus
The menus themselves are universal across all installations of WordPress. No matter what themes or plugins you are using on your site, you have the ability to create menus and keep those menus if you decide to change your theme or add and remove plugins (unless those themes and plugins actually mess with this core functionality, which they shouldn’t unless they have a really good reason).
Menu Locations
The menu locations are a different, but related, concept that is handled by your theme, and unless you are a theme editor (and in some cases a plugin editor) you cannot change them.
Menu locations are exactly as they sound – they are locations for the menus to show up on your website. Some common menu locations include header menus, footer menus, and sidebar menus.
Why Differentiate Between Menus and Menu Locations?
While this may seem overcomplicated, the beauty of separating menus from menu locations is that one menu can serve multiple menu locations. For example, if you want your site’s header menu and footer menu to always be in-sync, you only need to create one menu and put that single menu in both menu locations. That way, if you want to add, edit, or delete things off that menu, it updates in both menus at once and you never need to make the same change twice. If you’ve ever heard of the DRY Principle of software programming, you will understand the usefulness of this.
Finding the Menu Editor
Note: It’s possible that your theme doesn’t support menus, in which case the menu editor will not appear and this guide won’t have any relevance for you. If your theme doesn’t support menus, you might want to consider switching themes since having navigation menus is almost universal on the Internet in 2019 (and probably for some time to come).
There are multiple ways to get to the menu editor from WordPress. You can log into your WordPress Dashboard and find the “Menus” submenu under “Appearance” and click that.

There is also a shortcut if you are on your website’s frontend and you can see the admin bar. Hover your mouse over your site’s name and navigate down to “Menus”.

Using either of these options, you will find yourself on the WordPress menu editor screen.
Creating Menus
Once you are on the menu editor, you will either see your most recently edited menu, or a menu that WordPress automatically generates for you based on your sites’ pages.
Naming Your Menu
WordPress also names your menu “Menu 1” (or 2, 3, 4, etc if you already have “Menu 1” as a saved menu on your site).

Of course, you probably don’t want to refer to your menu as “Menu 1” so feel free to rename it to something useful. For example, if you are creating a menu for the header, maybe name it “Header Menu” – or “Footer Menu” for the footer. If you are creating 1 menu for your header and footer, “Universal Menu” or “Site Navigation” may be an appropriate name in that example. Choose what makes the most sense to you.
If your menu already looks good with what WordPress has generated for you (based on your site’s top-level pages), skip to the section about managing menu locations. Otherwise, keep reading!
Making Sure You Can See All Potential Menu Items
On the left, you will see potential menu items for your menu that will look similar, though probably not exactly, like this:

These are potential menu items taken from WordPress posts, pages, and other items present on your site depending on your particular combination of plugins.
There may be some things missing here that you expect to see, but don’t. If that’s the case, click “Screen Options” in the top right of the window.
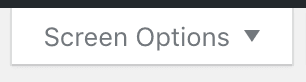
After clicking you should see something like this:

This will also look slightly different depending on your WordPress installation.
Any items checked under the “Boxes” option will appear in the menu items section on the left. If something is missing in the menu items section but appears in the screen options section, click the checkbox and it will appear. Conversely, if you find the menu items section crowded and would like to hide some items, uncheck them to hide them (but don’t forget how to get them back if you need them later).
Adding Items to Your Menu
Now I’m going to show you how to add items to the menu using my site’s pages. Keep in mind that the following also applies to posts, categories, WooCommerce items, and almost anything else that shows up as a potential menu item on the left.
To add a page to the menu, click the “Pages” option on the left to expand it (if it is not already expanded) and you will see 3 tabs:
- Most Recent
- View All
- Search
“Most Recent” is the default tab for this box, and the pages that have been most recently created will show up here.
If you have a lot of pages, there is a chance that some won’t show up here, in which case you will need to click “View All” to see the list of all pages on the site in alphabetical order.
And of course, if neither of those options is sufficient, you can click “Search” to find the page by typing in the page title.
Once you’ve found the page you would like to add to the menu, click the checkmark box and click the “Add to Menu” button.


The menu item will be added to the menu. If you already have items in the menu, the page you added will go to the bottom of the menu.


You can also add more than one element at once by selecting multiple checkboxes before clicking Add to Menu.


You can also make menu elements sub-menus by dragging and dropping them to where they are indented below other menu items.
Here, “Blog” and “Projects” are both items of the sub-menu “Spencer Cloud Consulting, LLC”.

Which look like this when implemented in my particular theme.

And here, “Blog” and “Pricing” are items of the sub-menu “Spencer Cloud Consulting, LLC”, while “Projects” is an item of the (sub-)sub-menu “Blog”.

Note: Not every theme can handle sub-menus, and those that do may not handle sub-menus (or sub-sub-menus, and so on) very well. Use at your own risk, and test menu changes on a staging or test site before editing a live site if you can.
As mentioned above, you can add more than just pages to your WordPress menus. You can add posts (particularly useful if you have a piece of cornerstone content that you would like to display prominently), post categories (useful if you run a blog and want your users to easily search your posts by categories), product categories (useful if you run a shop and want your users to easily search your products by categories) and much more.
Using Custom Links
Adding a custom link is useful if you can’t find the particular item you need in the other options, or if you need to link to a different site altogether. It’s straightforward, in that you enter the link URL and the Link Text you would like added to the menu.


One Big Caveat to Using Custom Links in Your Menu
Custom links are often overused since it can be a little bit quicker than adding an official menu item to a website, but this often causes issues down the road.
Websites are not static creatures, and editing one element can have unpredictable knock-on effects, which are immeasurably worse when poorly planned. For example, let’s say I want to add the “Projects” page to my menu, but instead of finding Projects in the Pages box on the left, I use Custom Links and type “https://spencercloud.com/projects” and make the link text “Projects” and click add.
It saves ~10 seconds now, but a year later I may change that page’s URL, I may delete that page, or the entire site’s permalink structure could change. If I added it as a page element, it would update automatically (including removing itself in the case where I delete it), but since I added it as a custom link in this case, everything will still look fine, but I won’t know there is an issue until I click on it and it brings me to a 404 page, or site user tries to use it, gets frustrated by the broken link, and contacts me about it (most of them won’t, though, and will leave your site in frustration, and you won’t know why).
Editing Menu Items
Once you’ve added all the items to your menu, you may want to edit the way some of them show up. This is relatively easy. Click the arrow next to the item and you’ll have the option to change the name of the menu item.
In our example, the page I added to the menu is officially called Spencer Cloud Consulting, LLC, but that’s because it’s my homepage. It would look nicer if the menu item was simply called “Home”.
To rename the menu item, simply replace the text with what you want to appear instead
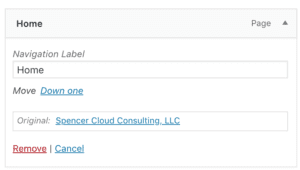
If you edit this menu item later, you can still see what it was originally by looking at the text/link after “Original:”.
Managing Multiple Menus
If you only want 1 menu on your site, skip to managing menu locations. However, if you would like multiple menus, keep reading.
If you only have 1 menu saved in your WordPress installation, you will see a notice near the top of the editor that looks like this:

However, once you click “create a new menu”, create your menu, then save it, the notice will be replaced by something that looks like this:

The dropdown shows each menu you have saved on your site. If the menu is assigned to a location (more about that below) the location will show up in parenthesis after the menu name.
To edit a menu that has already been created, select the menu from the dropdown and then click the “Select” button. You will then be brought to the editor for that menu.
Managing Menu Locations
Once you’ve created your menu, you need to decide where on the site this will appear.
The quick way to do this is by using the checkboxes below the menu editor and then hitting “Save Menu”. Once you do this, you’re done! Unless you want to create more menus, in which case, repeat the appropriate steps above. Otherwise, keep reading to learn about more advanced menu location management. Or skip to the conclusion.
Once you’ve saved your menu, whether it has a location or not, you will be presented with a new tab called “Manage Locations”.

Click it and you will be brought to the menu location management screen.

WordPress gives a helpful notification based on how many menu locations your theme supports and lists them under Theme Locations. In this example, we have 2 locations: Primary Menu and Footer Menu.
As far as menu locations go, you are at the mercy of your website’s theme. You cannot add or delete menu locations without editing the theme (preferably as a child theme). Or you can use a plugin built for adding menu locations to the theme (results may vary), or change your theme altogether. More on that in the conclusion.
Under the “Assigned Menu” column of this, there are dropdowns that contain all the menus you’ve created on your site. In the image above, “Main Menu” is assigned to the “Primary Menu” menu location, and nothing is assigned to the “Footer Menu” location in the theme.
To change these settings, select a different menu from the dropdown and click “Save Changes”.

Here we can see that I selected the “Footer Menu” menu, for the “Footer Menu” menu location in the theme (that was a mouthful). It can be a little confusing to have your menu name the same as your menu location name, so it’s important to keep it straight in your head.
Remember that you can also use 1 menu in multiple locations. Simply select the same menu in the “Assigned Menu” column and hit “Save Changes”.

Conclusion
WordPress menus are something that seem simple from the outset, but can become complicated quickly.
This was just a guide for beginners, and I hope you’ve found it to be useful, but for more more in-depth guides, check out: